本文系本作者原创,如有任何知识产权、版权问题或理论错误,还请指正。 转载请注明原作者及出处,谢谢配合。
启动流程
当用户点击“Pointer Location”按钮后,系统会在所有窗口之上创建一个顶端view:PointerLocationView,该view就是我们看到显示touch运动轨迹的图层.
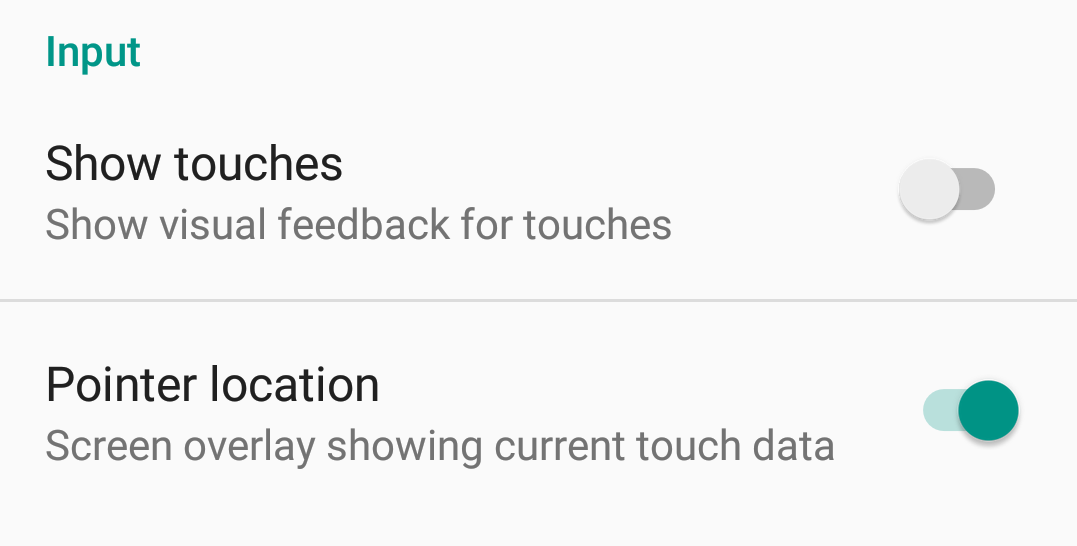
下图就是从用户点击按钮到图层显示的流程,从图中可以看出按钮是在DevelopmentSettings类中定义的,按钮的状态关联了ContentProvider中的Settings.System.POINTER_LOCATION属性,PhoneWindowManage通过监听该属性达到显示或者隐藏view的目的。显示或隐藏是通过enablePointerLocaiont()和disablePointerLocation()方法将PointerLocationView在WindowManager中添加或者删除的。
其中需要注意的一点,PhoneWindowManager在将PointerLocationView添加到WindowManager之后,会一并将其注册到PointerEventDispatcher中。当底层上报输入事件时,PointerEventDispatcher会通过OnPointerEvent()方法通知它的注册者响应输入事件,第三节将详细论述该点。

Pointer Location显示
Pointer Location中的“Pointer”就是能够产生运动轨迹的物体或者单个手指。
当前活动的或者到上次事件发送后还没有移动的所有pointers的信息我们用Motion events表示。Motion event包含了action code和一系列属性,主要用来描述运动的。其中action code用来定义状态变化,比如pointer抬起或者放下;属性值表示的是pointer的位置信息和其他一些运动属性,比如压力和size等。当某一个独立的pointer抬起或者放下,pointers的数量会发生变化,除了一种情况,就是这个手势被cancel了。
Motion event还有一个属性MotionEvent.TOOL_TYPE_XXX用来说明当前的pointer源,比如铁笔指示笔,橡皮擦,手指或者鼠标;用户可以通过getToolType(int)方法来得到当前pointer究竟是什么。具体代码在以下路径:
frameworks/base/core/java/android/view/MotionEvent.java
说完Pointer Location中的Pointer的意义,我们来看看Pointer Location。 Pointer Location反映的是输入设备上pointer的运动轨迹,而运动轨迹的相关属性在很大程度上取决于输入设备的类型。所以我们还要先了解android系统支持的输入设备类型:
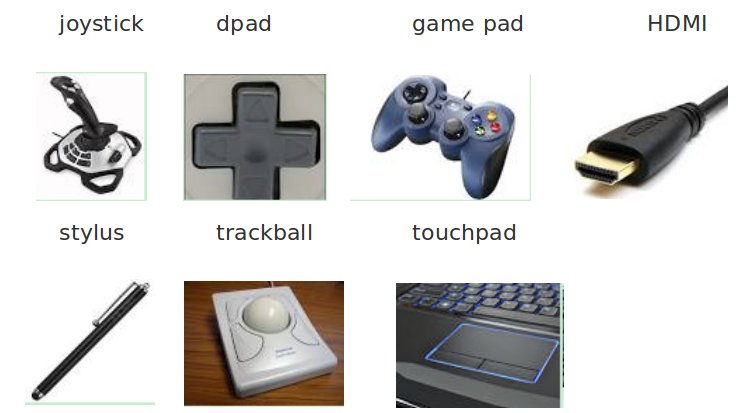
输入设备(InputDevice.SOURCE_CLASS_XXX)有五种泛类型Joystick、轨迹球trackball、按键类(键盘、DPAD、game pad、HDMI)、带显示的定点设备pointing device(触摸屏、鼠标、铁笔指示笔stylus、蓝牙铁笔)、不带显示的定点设备(触摸板,鼠标上的滚轮)。涉及到的代码路径为:
frameworks/base/core/java/android/view/InputDevice.java
下图列出了相关输入设备的图例:
带显示的定点设备比如touch screens,pointer的坐标用绝对位置比如view X/Y坐标表示。每个完整的动作(gesture)用一系列代表pointer状态转换和运动状态的motion event表示。这个完整的动作包括起始点:第一个pointer点击时的motion event,其action用ACTION_DOWN表示。另外,当同时有其他的pointer落下或者抬起时,framework会用带有ACTION_POINTER_DOWN或者ACTION_POINTER_UP的motion event表示。中间状态:pointer滑动,motion event的action表示为ACTION_MOVE。以及最后的结束点:最后一个pointer抬起(ACTION_UP)或者这个gesture被cancel了(ACTION_CANCEL)。
一些不带显示的定点设备,比如鼠标中间的垂直或者水平的滚轮,它们的scroll event会通过generic motion event的“ACTION_SCROLL”反馈给上层。
轨迹球设备的pointer坐标使用的是X/Y deltas的相对运动坐标,一个轨迹球gesture包含一系列带有ACTION_MOVE的motion event,和散布在其中的“ACTION_DOWN”和“ACTION_UP”的motion event代表了轨迹球被按下或者释放。
Joystick游戏杆的pointer坐标使用joystick axes的绝对位置。其值被归一化到-1.0~1.0,其中0.0代表中间位置。一些通用的joystick axes有AXIS_X, AXIS_Y,AXIS_HAT_X, AXIS_HAT_Y, AXIS_Z和AXIS_RZ.
对于上面这五种输入设备,PointerLocationView只分了两种情况反映不同输入设备的运动轨迹:一种就是在显示界面之上盖一个透明的view用图形和线条表示运动,本节接下来的篇幅将详细分析和说明;另一种就是通过log输出运动轨迹,这个会在之后讲解PointerLocationView类的时候提及。
Lables图示说明
下图就是截取PointerLocationView最顶端的显示界面:

可以看出该区域被分成了七小块用来显示5部分内容,下面将分别介绍每个部分的意义。
-
P:x/y P就是pointers; x是current number pointers, y是max number pointers,这些都是指在一个完整gesture中的。也就是,当同时用三手指触摸时x=y=3,而当只抬起一根手指时,当前屏幕上只有两根手指了,但是整个手势事件中最大pointers数是3,所以,x=2,y=3。显示为P:2/3
-
X:639.0 / Y:998.0 X是active pointer的X轴坐标;Y是active pointer的Y轴坐标。当多点触摸时只有一个pointer是激活pointer(ActivePointer),所以X,Y表示的就是这个ActivePointer的X和Y轴坐标
-
Xv:0.0 / Yv:0.0 Xv和Yv分别代表了pointer当前触摸点point的X轴和Y轴方向上的速度,该速度是将MotionEvent传入VelocityTracker对象中通过计算得到的有正负区分,X轴向右,Y轴向下代表了正方向,否则为负数。多点触摸的情况下,Xv和Yv代表了ActivePointer的状态
-
Prs:0.68 Prs表示Press是一个归一化值,代表一个手指或者其他设备作用在屏幕上的压力值。它是MotionEvent内部类PointerCoords中的一个属性,这里是通过MotionEvent的getHistoricalPointerCoords()或者getPointerCoords()方法中得到的PointerCoords类对象,从而得到该属性的。取值范围为0~1,但是也会有大于1的值出现,这取决于设备设置
-
Size:0.33 Size与Press类似也是一个归一化值,是MotionEvent内部类PointerCoords中的另一个属性,描述了设备的最大可探测区域上pointer touch area的近似大小,代表了屏幕被按压区域的近似大小,该值可以用在决定是否是fat touch event上,取值范围为0~1
其中,第二、三块区域的X,Y轴坐标显示比较特殊。当用户点击屏幕并滑动的时候显示的是X:xx/Y:xx,但当用户抬起所有手指,即结束这次手势时,第二、三块区域显示的是dX:xx和dY:xx,并且当dX或者dY的绝对值大于ViewConfiguration的getSaledTouchSlop()方法所获得的门限值时背景会被置红,而小于门限值背景为灰色,此种行为被当做点击事件处理,如下图:

- dX:104.0 / dY:-623:0 dX和dY分别代表整个手势结束后活动点(ActivePointer)在X轴和Y轴方向上起始点到终止点的差值,其中X轴上从左到右为正值,Y轴上从上到下是正值,否则为负值。
Path图示说明
下图是当用户点击屏幕并滑动时的trace轨迹图,这个是滑动状态:
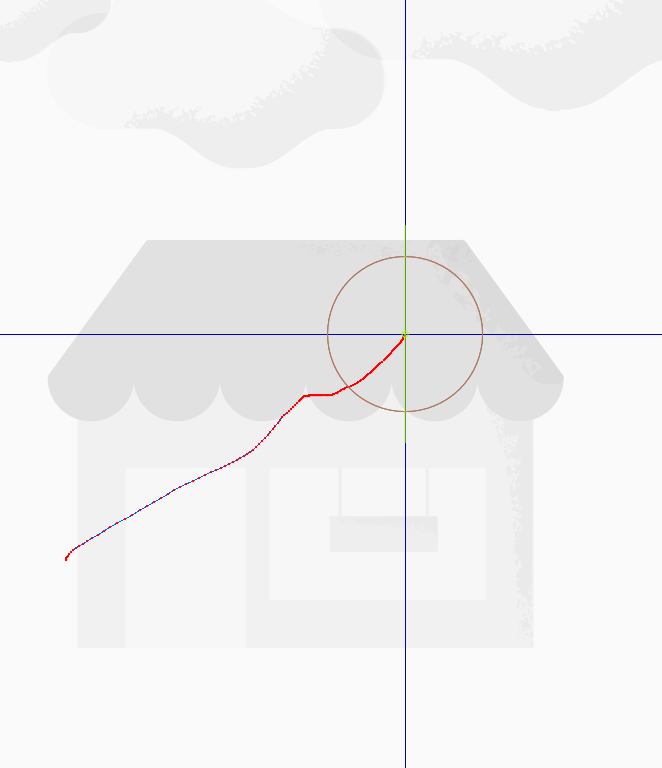
- 有压力反馈的时候会有一个圆圈包裹手指触摸区域,代表了当前点的压力和接触面,圈的颜色随着压力值的变化而变化
if (mCurDown && ps.mCurDown) {
    // Draw current touch ellipse.
    mPaint.setARGB(255, pressureLevel, 255 - pressureLevel, 128);
    drawOval(canvas, ps.mCoords.x, ps.mCoords.y, ps.mCoords.touchMajor,
            ps.mCoords.touchMinor, ps.mCoords.orientation, mPaint);
}
- 像蚯蚓一样带有红色或者亮蓝色原点的蓝色曲线就是手指滑动的运动轨迹,这些点都是底层报上来的数据被封装在MotionEvent类中,通过调用该类的getPointerCoords(index, coords)得到当前触摸点的坐标——红色原点,调用该类的getHistoricalPointerCoords(index, historyPos, coords)得到历史触摸点的坐标——亮蓝色原点。最后用蓝色线将每个原点连接在一起就形成了如图所示的红蓝曲线

关于历史触摸点即earlier movement samples,涉及到了MotionEvent的batching机制,原文解释如下:
For efficiency, motion events with ACTION_MOVE may batch together multiple movement samples within a single object. The most current pointer coordinates are available using getX(int) and getY(int). Earlier coordinates within the batch are accessed using getHistoricalX(int, int) and getHistoricalY(int, int). The coordinates are “historical” only insofar as they are older than the current coordinates in the batch; however, they are still distinct from any other coordinates reported in prior motion events. To process all coordinates in the batch in time order, first consume the historical coordinates then consume the current coordinates.
也就是说在ACTION_MOVE动作中底层报上来的触摸点上层并不会都处理, MotionEvent对象会将每个pointer的多个已经过去、但是仍在这次event事件中的采样数据点作为“historical”点保留下来,通过MotionEvent的getHistoricalX(int,int)和getHistoricalY(int,int)方法得到其坐标。进一步说,“historical”点就是在这次batch中比当前点older的点的集合。而当前点的坐标在一次event事件中每个pointer只有一个,用getX(int),和getY(int)方法得到。注意,想要处理一个batch中的所有坐标点的信息,要先处理historical的坐标,再处理当前坐标点。
读取蓝点(historical点)的代码:
final int N = event.getHistorySize();
// historical点可能不止一个或0个
for (int historyPos = 0; historyPos < N; historyPos++) {
    for (int i = 0; i < NI; i++) {
        final int id = event.getPointerId(i);
        final PointerState ps = mCurDown ? mPointers.get(id) : null;
        final PointerCoords coords = ps != null ? ps.mCoords : mTempCoords;
        event.getHistoricalPointerCoords(i, historyPos, coords);
        if (mPrintCoords) {
            logCoords("Pointer", action, i, coords, id, event);
        }
        if (ps != null) {
            // 将historical点加入trace,注意false代表的就是historical点
            ps.addTrace(coords.x, coords.y, false);
        }
    }
}
读取红点(current点)的代码:
for (int i = 0; i < NI; i++) {
    final int id = event.getPointerId(i);
    final PointerState ps = mCurDown ? mPointers.get(id) : null;
    final PointerCoords coords = ps != null ? ps.mCoords : mTempCoords;
    event.getPointerCoords(i, coords);

if (ps != null) {
    // 将当前点加入trace,true代表当前点。注意每个pointer只执行一次
        ps.addTrace(coords.x, coords.y, true);
        ps.mXVelocity = mVelocity.getXVelocity(id);
        ps.mYVelocity = mVelocity.getYVelocity(id);
        mVelocity.getEstimator(id, ps.mEstimator);
        ps.mToolType = event.getToolType(i);
    }
}
画点的代码:
// Pointer trace.
for (int p = 0; p < NP; p++) {
    final PointerState ps = mPointers.get(p);
    // Draw path.
    final int N = ps.mTraceCount;
    float lastX = 0, lastY = 0;
    boolean haveLast = false;
    boolean drawn = false;
    mPaint.setARGB(255, 128, 255, 255);     // light blue
    for (int i=0; i < N; i++) {
        float x = ps.mTraceX[i];
        float y = ps.mTraceY[i];
        if (Float.isNaN(x)) {
            haveLast = false;
            continue;
        }
        if (haveLast) {
            canvas.drawLine(lastX, lastY, x, y, mPathPaint);
            final Paint paint = ps.mTraceCurrent[i] ? mCurrentPointPaint : mPaint;
            canvas.drawPoint(lastX, lastY, paint);
            drawn = true;
        }
        lastX = x;
        lastY = y;
        haveLast = true;
    }
其实每个touch事件来的时候,MotionEvent只携带了本次事件中所有pointers信息,就算里面含有“historical”点也是跟上一次MotionEvent中的点不一样的。而每次屏幕刷新都需要将所有点重绘,并不像肉眼看到的只是多画出手指滑动的那些点。所以PointerLocationView类定义了一个内部类PointerState专门用来保存每个pointer的所有信息,包括它的previous trace,然后在onDraw()方法中只需要循环画出每个pointer对应的PointerState对象中的trace信息就行了。关于PointerState类,下一节将详细讲解。
- 手指滑动的过程中,当前手指所在的位置都会有一个蓝色的十字交叉线代表当前位置,反映了滑动轨迹中的最后一个点的坐标,涉及到的代码如下:
if (mCurDown && ps.mCurDown) {
// Draw crosshairs.
// ps.mCoords就是当前点的坐标属性
    canvas.drawLine(0, ps.mCoords.y, getWidth(), ps.mCoords.y, mTargetPaint);
    canvas.drawLine(ps.mCoords.x, 0, ps.mCoords.x, getHeight(), mTargetPaint);
}
- 可以发现最后一个点也就是当前触摸点颜色并不是红色或者亮蓝色,而是在不断变换的。它是用户当前触摸位置,而颜色是根据用户触摸的压力值而变化的。代码如下:
if (mCurDown && ps.mCurDown) {
    // Draw current point.
    int pressureLevel = (int)(ps.mCoords.pressure * 255);
    mPaint.setARGB(255, pressureLevel, 255, 255 - pressureLevel);
    canvas.drawPoint(ps.mCoords.x, ps.mCoords.y, mPaint);
}
- 十字星中垂直方向的绿色线是orienttation arrow。它是根据当前触摸点坐标的orientation属性和toolMajor属性的计算的。因为我们使用的是手指,所以画的是half circle orientation,也就是上图中的绿线。对应代码如下:
if (mCurDown && ps.mCurDown) {
    // Draw the orientation arrow.
    float arrowSize = ps.mCoords.toolMajor * 0.7f;
    if (arrowSize < 20) {
        arrowSize = 20;
    }
    mPaint.setARGB(255, pressureLevel, 255, 0);
    float orientationVectorX = (float) (Math.sin(ps.mCoords.orientation)
            * arrowSize);
    float orientationVectorY = (float) (-Math.cos(ps.mCoords.orientation)
            * arrowSize);
    if (ps.mToolType == MotionEvent.TOOL_TYPE_STYLUS
            || ps.mToolType == MotionEvent.TOOL_TYPE_ERASER) {
        // Show full circle orientation.
        canvas.drawLine(ps.mCoords.x, ps.mCoords.y,
                ps.mCoords.x + orientationVectorX,
                ps.mCoords.y + orientationVectorY,
                mPaint);
    } else {
        // Show half circle orientation.
        canvas.drawLine(
                ps.mCoords.x - orientationVectorX,
                ps.mCoords.y - orientationVectorY,
                ps.mCoords.x + orientationVectorX,
                ps.mCoords.y + orientationVectorY,
                mPaint);
    }
}
其实在滑动状态下还有两条线我们还没有介绍,一个是代表模拟运动轨迹的紫线,一个是代表速度向量的红线,因为在滑动的过程中他们都很短并且被手指或者设备遮挡,一般不容易看到,所以我放在滑动结束的状态中介绍。
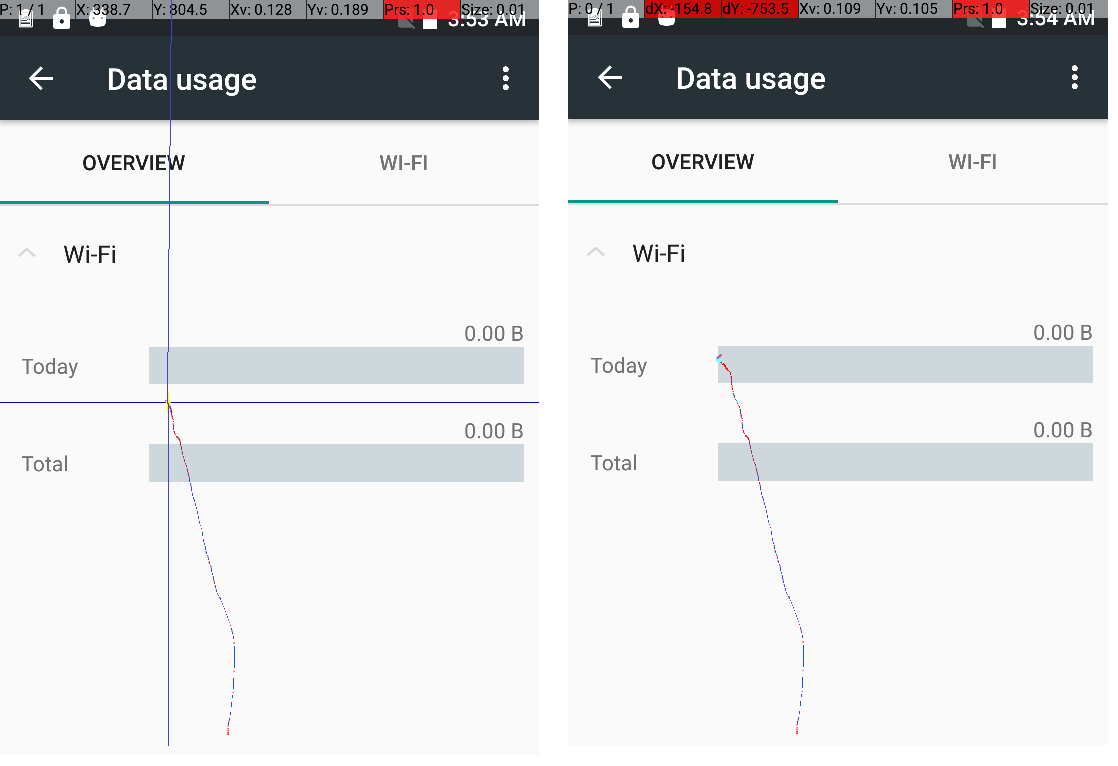
现在来介绍当滑动结束后的轨迹显示。当我们停止滑动,也就是将所有手指抬起后,十字星线,当前点的动态颜色表示,代表当前点的压力和接触面的圆圈和orientation arrow都会消失,只留下了如下图所示的运动轨迹和上面提到的红线和紫线。右图是放大红线和蓝线的图示,下面我要着重分析这两条线:
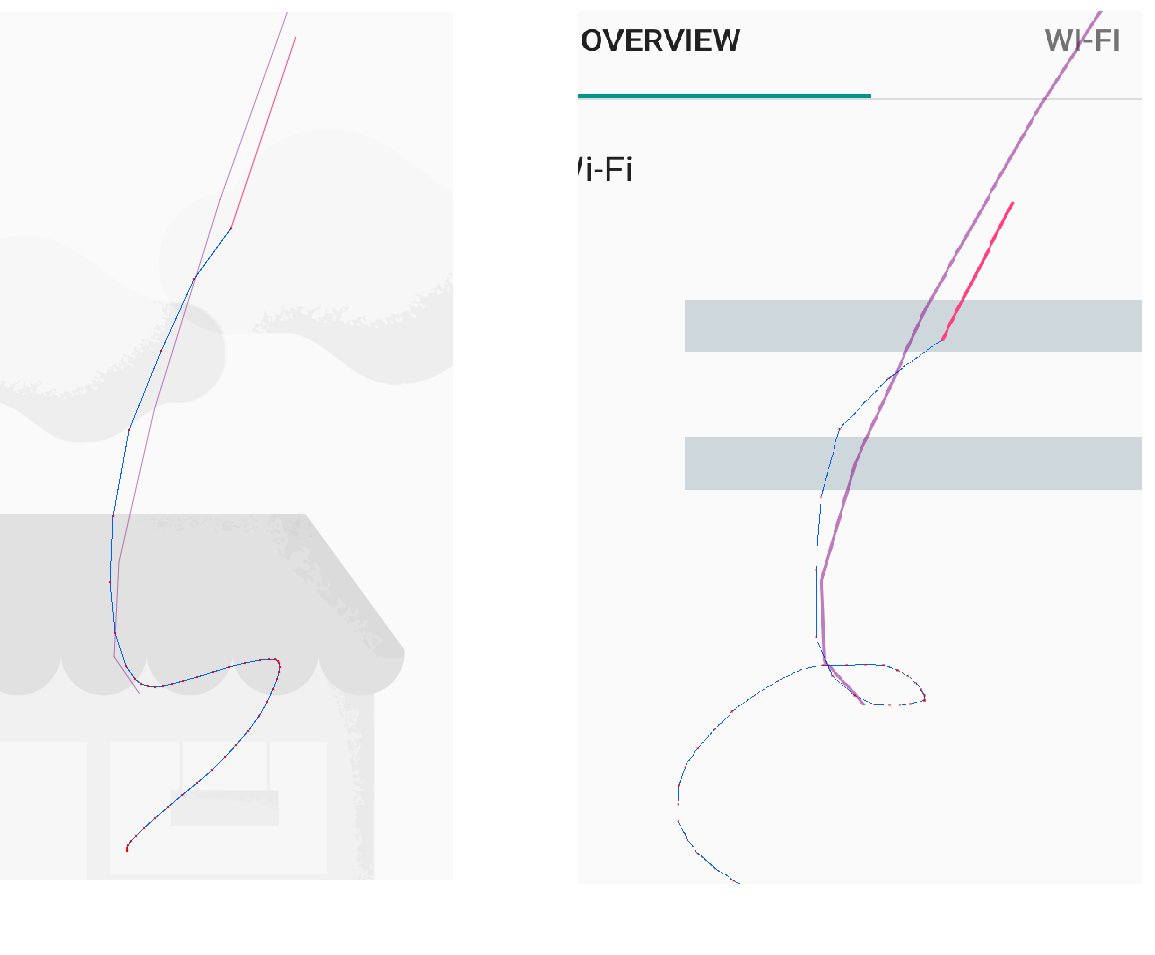
- 代表手势运动的速度向量——红线。对于调用MotionEvent的getPointerCoords(index, coords)方法得到的当前触摸点,会通过VelocityTracker类对象计算出每一个点的X,Y轴的速度getXVelocity(id),getYVelocity(id)。而在onDraw方法中会在最后一个点(当前触摸点)上画出该点的速度向量。相关的代码如下:
读取触摸点速度向量的代码:
if (ps != null) {
    ps.addTrace(coords.x, coords.y, true);
    ps.mXVelocity = mVelocity.getXVelocity(id);
    ps.mYVelocity = mVelocity.getYVelocity(id);
    mVelocity.getEstimator(id, ps.mEstimator);
    ps.mToolType = event.getToolType(i);
}
画出最后一个点的速度向量的代码:
if (drawn) {
    // Draw velocity vector.
    mPaint.setARGB(255, 255, 64, 128);      // pink
    float xVel = ps.mXVelocity * (1000 / 60);
    float yVel = ps.mYVelocity * (1000 / 60);
    canvas.drawLine(lastX, lastY, lastX + xVel, lastY + yVel, mPaint);
}
- 模拟手指的运动轨迹——紫线。仍然是针对getPointerCoords(index, coords)方法得到的当前触摸点,通过VelocityTracker类对象得到它的内部类对象VelocityTracker.Estimator,然后完全用该对象通过算法模拟出对应点的一系列未来走向。该曲线可用来评估实体TP报点的精准性,如果蓝线和紫线靠的越近,可以推断TP反应越好,反之亦然
得到VelocityTracker.Estimator类对象的代码:
mVelocity.getEstimator(id, ps.mEstimator);
画曲线的代码:
if (drawn) {
    // Draw movement estimate curve.
    mPaint.setARGB(128, 128, 0, 128);       // dark pink
    float lx = ps.mEstimator.estimateX(-ESTIMATE_PAST_POINTS * ESTIMATE_INTERVAL);
    float ly = ps.mEstimator.estimateY(-ESTIMATE_PAST_POINTS * ESTIMATE_INTERVAL);
    for (int i = -ESTIMATE_PAST_POINTS + 1; i <= ESTIMATE_FUTURE_POINTS; i++) {
        float x = ps.mEstimator.estimateX(i * ESTIMATE_INTERVAL);
        float y = ps.mEstimator.estimateY(i * ESTIMATE_INTERVAL);
        canvas.drawLine(lx, ly, x, y, mPaint);
        lx = x;
        ly = y;
    }
}
下图是Press固定为1.0,size为0.01时手指滑动和滑动结束后的两张对比图,可以看出滑动结束后只剩下接触点和蓝线的痕迹。
PointerLocationView类分析
类继承和实现关系
这一节我会对PointerLocationView类中几个关键地方加以说明。首先我们来看看PointLocationView都实现和继承了哪些类:

- 被继承的类View:
为了响应Game controllers的输入事件,PointerLocationView类继承了View类的onGenericMotionEvent(),onKeyDown(),onKeyUp()三个回调函数并以log的形式输出运动轨迹。
Called to process generic motion events such as joystick movements.
“Generic motion events”描述的事件包括:操纵杆转动事件(joystick movements),鼠标滑动事件(mouse hovers),触摸板触摸事件(track pad touches),鼠标上的滚轮滚动事件(scroll wheel movements)以及其他的输入事件。
通过MotionEvent.getSource()可以得到当前事件的source Id,再通过比对InputDevice.SOURCE_CLASS_XXX就可以获取到当前事件的输入设备类型。
PointerLocationView中如果类型是SOURCE_CLASS_POINTER,即带显示的定点设备会画出图形;如果是Joystick,不带显示的定点设备或者其他类型都是打印log。
Called to process a press/release of a physical key such as a gamepad or D-pad button.
与onGenericMotionEvent()方法一起作为game controllers的输入事件响应。PointerLocationView中如果是DPAD事件或者是修饰键(Modifier keys)事件时输出log信息
onTrackballEvent:
轨迹球的回调函数。PointerLocationView中当有轨迹球滑动时只输出log信息。
onTouchEvent:
View类的onTouchEvent()方法是用来接收View上的touch事件的。如果返回true,意味着该View处理了touch事件,那么Android系统就不会继续将该事件分发给view hierarchy中的其他view;如果返回false,则其他view还有机会得到该touch事件。
其实这里有个疑问,如果PointerLocationView类的onTouchEvent()方法被调用的话,那么被它覆盖的其他的view应该都无法接收到touch事件了,因为它返回的是true!经过log分析,发现onTouchEvent()方法根本就没有执行,所有跟touch有关的事件都被PointerEventListener类的onPointerEvent()方法执行了
因为在将PointerLocationView添加到WindowManager时给该view设置了两个flag:FLAG_NOT_TOUCHABLE, FLAG_NOT_FOCUSABLE。所以该View不会接收View类的onTouchEvent()方法。(待证实!)还要注意一点,PointerLocationView它的属性是TYPE_SECURE_SYSTEM_OVERLAY是一个系统view。解释如下:
/**
 * Window type: secure system overlay windows, which need to be displayed
 * on top of everything else.  These windows must not take input
 * focus, or they will interfere with the keyguard.
 *
 * This is exactly like {@link #TYPE_SYSTEM_OVERLAY} except that only the
 * system itself is allowed to create these overlays.  Applications cannot
 * obtain permission to create secure system overlays.
 *
 * In multiuser systems shows only on the owning user's window.
 * @hide
 */
public static final int TYPE_SECURE_SYSTEM_OVERLAY = FIRST_SYSTEM_WINDOW+15;
- 被实现的类PointerEventListener:
之前我提过PhoneWindowManager在将PointerLocationView添加到WindowManager之后,会一并将其注册到PointerEventDispatcher中。PointerEventDispatcher类继承自InputEventReceiver可以直接从底层机制得到input events然后通过PointerEventListener接口的OnPointerEvent()方法传给它的注册者们。涉及到的代码如下:
将PointerLocationView添加到WindowManager并注册到PointerEventDispatcher:
frameworks/base/services/core/java/com/android/server/policy/PhoneWindowManager.java frameworks/base/services/core/java/com/android/server/wm/WindowManagerService.java
PointerEventDispatcher通过PointerEventListener接口将input events分发给它的注册者们:
frameworks/base/services/core/java/com/android/server/wm/PointerEventDispatcher.java
PointerEventListener接口:
frameworks/base/services/core/java/android/view/WindowManagerPolicy.java
注意onPointerEvent()方法是跑在service.Ui线程中的;当onPointerEvent返回的时motionEvent会被回收,所以执行完onPointerEvent()方法并不会影响motionEvent继续分发到其他view中。
- 被实现的类InputDeviceListener:
InputDeviceListener接口是用来监听输入设备变化的,比如有新的设备加入、删除设备或者设备的属性发生变化会分别调用其函数onInputDeviceAdded(int),onInputDeviceRemoved(int),onInputDeviceChanged(int)。涉及到的代码如下:
frameworks/base/core/java/android/hardware/input/InputManager.java
在PointerLocationView类中如果以上三个方法中某一个被调用都会输出相应的log用来说明发生变化的设备的信息。
PointerState内部类
之前说过PointerLocationView类定义了一个内部类PointerState专门用来保存每个pointer的所有信息,包括它的previous trace,然后在onDraw()方法中只需要循环画出每个pointer对应的PointerState对象中的trace信息。
所以该类中的变量涵盖了画图或者log中需要的所有信息,其中mTraceX/mTraceY就是一个pointer划过所有点的X/Y坐标集合,它是通过方法addTrace()添加的。每个点是否是当前点而不是historical点是用mTraceCurrent变量保存的。如果当前MotionEvent中属于这个PointerState的action是个ACTION_DOWN或者ACTION_POINTER_DOWN,则mCurDown为true。还有一些其他的信息比如该Pointer的当前点速度向量,坐标等如下表所列:
| Value | Description |
| mTraceX/mTraceY (float[]) | The X/Y coordinates of all the points for one pointer trace |
| mTraceCurrent (boolean[]) | Whether the every point is current point; false means historical sample. |
| mTraceCount (int) | The number of the points for one pointer trace |
| mCurDown (boolean) | True if the pointer is down. |
| mCoords (PointerCoords) | Most recent point’s coordinates |
| mToolType | The pointer’s tool type |
| mXVelocity/mYVelocity (float) | Most current point’s X/Y velocity |
| mEstimator (VelocityTrakcer.Estimator) | Position estimator used for caculate point’s velocity |
以上所有的变量都是针对一个Pointer的。即每个pointer对应一个PointerState对象,比如用三个手指在屏幕上滑动就会有三个对应的PointerState对象记录每个手指在屏幕上的滑动状态。但是对于整个滑动事件,比如当前是否是按压状态;当前在屏幕上的手指数;整个手势过程中在屏幕上按压的最大手指数,这些状态都被在PointerLocationView中的变量记录着。下表就列出了关键的几个属性:
| Value | Description |
| mCurDown (boolean) | The current gesture is down state for all the pointers |
| mCurNumPointers (int) | The number of the current pointers for this gesture |
| mMaxNumPointers (int) | The maxium number of the pointers for this gesture |
| mActivePointerId (int) | The active pointer’s index |
| mPointers (Arraylist<PointeState>) | All the pointers’ PointerState for this gesture |
其中需要说明的是,一个多点触摸的手势中只有一个手指是active pointer,大多数情况下都是第一个接触屏幕的手指。如果抬起这根手指,那么对应的active pointer会发生变化:
if (action == MotionEvent.ACTION_UP
        || action == MotionEvent.ACTION_CANCEL) {
    mCurDown = false;
    mCurNumPointers = 0;
} else {
    mCurNumPointers -= 1;
if (mActivePointerId == id) {
    // 这里就是active pointer切换的代码
        mActivePointerId = event.getPointerId(index == 0 ? 1 : 0);
    }
    ps.addTrace(Float.NaN, Float.NaN, false);
}
addTrace()中为了提供效率采用数组记录点坐标,如果数组已满就会新建一个double长度的数组并将所有数据拷入新的数组中。所以用一个变量mTraceCount来跟踪pointer的所有划过点的个数而不是数组的长度。如果mTraceCount为0就相当于清空数组,PointerState用clearTrace()方法来清空Trace记录:
public void clearTrace() {
    mTraceCount = 0;
}
public void addTrace(float x, float y, boolean current) {
    int traceCapacity = mTraceX.length;
    if (mTraceCount == traceCapacity) {
        traceCapacity *= 2;
        float[] newTraceX = new float[traceCapacity];
        System.arraycopy(mTraceX, 0, newTraceX, 0, mTraceCount);
        mTraceX = newTraceX;
        float[] newTraceY = new float[traceCapacity];
        System.arraycopy(mTraceY, 0, newTraceY, 0, mTraceCount);
        mTraceY = newTraceY;
        boolean[] newTraceCurrent = new boolean[traceCapacity];
        System.arraycopy(mTraceCurrent, 0, newTraceCurrent, 0, mTraceCount);
        mTraceCurrent= newTraceCurrent;
    }
    mTraceX[mTraceCount] = x;
    mTraceY[mTraceCount] = y;
    mTraceCurrent[mTraceCount] = current;
    mTraceCount += 1;
  }
}
当检测到MotionEvent的action是ACTION_DOWN说明一个新的手势发生了,那么就需要清空所有上次手势的记录重新开始记录新手势的状态:
if (action == MotionEvent.ACTION_DOWN) {
    for (int p=0; p<NP; p++) {
        final PointerState ps = mPointers.get(p);
        ps.clearTrace();
        ps.mCurDown = false;
    }
    mCurDown = true;
    mCurNumPointers = 0;
    mMaxNumPointers = 0;
    mVelocity.clear();
    if (mAltVelocity != null) {
        mAltVelocity.clear();
    }
}
Systrace解析
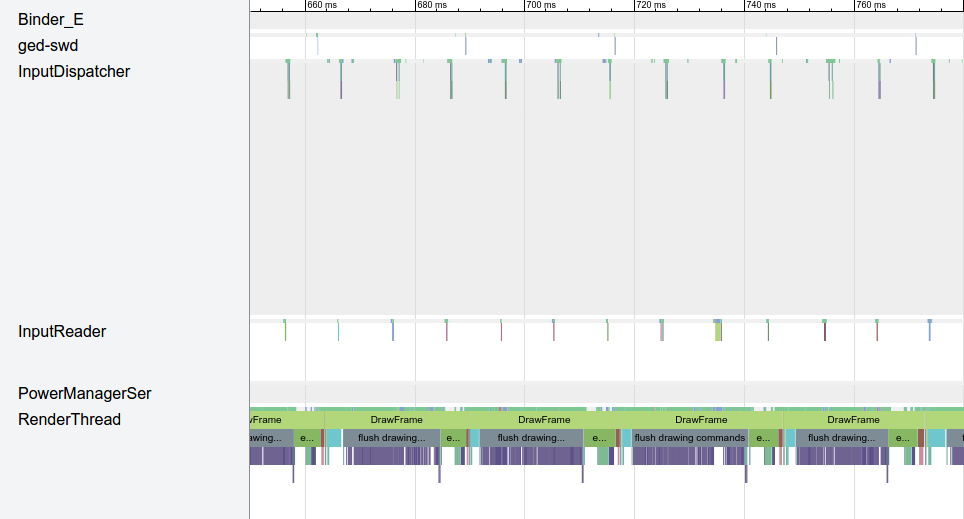
下图是手指在触摸屏上滑动的systrace图,需要说明的是滑动时整个进程是跑在system_server进程中的。
可以看出在该进程中有InputReader读取input事件并触发InputDispatcher将事件分发给PointerLocationView,然后该view调用View类的onDraw()方法显示每个pointer的状态和轨迹,RenderThread和<…>执行的就是画图行为。

经典代码片段
最后一节我想介绍下PointerLocationView中一个关于优化performance的代码片段,对于一些显示或者打印的状态并不是使用StringBuilder或String输出,因为当多个手指点击屏幕的时候使用这些类会导致应用卡顿,所以作者自己写了一个用char[]储存显示信息的FasterStringBuilder类。这个类中用到一些技巧值得我们学习和借鉴,下面我将直接针对代码进行分析:
// A quick and dirty string builder implementation optimized for GC.
// Using String.format causes the application grind to a halt when
// more than a couple of pointers are down due to the number of
// temporary objects allocated while formatting strings for drawing or logging.
private static final class FasterStringBuilder {
    // 用来存储的显示字符
private char[] mChars;

// 显示字符的长度,并不是通过mChars.length来确定
    private int mLength;
    public FasterStringBuilder() {
        mChars = new char[64];
}
// 清除并不会清除mChars里的内容,而是将字符的长度置空
    public FasterStringBuilder clear() {
        mLength = 0;
        return this;
}
// 如果添加的是string类型直接用getChars()方法将string拷入mChars
// reserve()方法是用来当mChars容量满后扩充容量的
    public FasterStringBuilder append(String value) {
        final int valueLength = value.length();
        final int index = reserve(valueLength);
        value.getChars(0, valueLength, mChars, index);
        mLength += valueLength;
        return this;
}
// 添加int类型,zeroPadWidth是总长度,如果value不足首位用0补
    public FasterStringBuilder append(int value, int zeroPadWidth) {
        final boolean negative = value < 0;
        if (negative) {
            value = - value;
        // 如果value超出int字节最大限制,则直接返回二进制26个0的int值
            if (value < 0) {
                append("-2147483648");
                return this;
            }
        }
      // 上个判断之后value总为正值
        int index = reserve(11);
        final char[] chars = mChars;
     // 如果value是0特殊值就直接处理
        if (value == 0) {
            chars[index++] = '0';
            mLength += 1;
            return this;
        }
        if (negative) {
            chars[index++] = '-';
        }
     // 根据zeroPadWidth的大小为整数前面加0
        int divisor = 1000000000;
        int numberWidth = 10;
        while (value < divisor) {
            divisor /= 10;
            numberWidth -= 1;
            if (numberWidth < zeroPadWidth) {
                chars[index++] = '0';
            }
        }
      // 将整数拆分存入chars[]中
        do {
            int digit = value / divisor;
            value -= digit * divisor;
            divisor /= 10;
        // 存储的是数字的ASCii码,所以用0的ASCii码加任意字符就是该字
            chars[index++] = (char) (digit + '0');
        } while (divisor != 0);
        mLength = index;
        return this;
}
// 添加float类型,precision是小数点后的精度值
    public FasterStringBuilder append(float value, int precision) {
        int scale = 1;
        for (int i = 0; i < precision; i++) {
            scale *= 10;
        }
     // rint()方法:四舍五入,小数点后为0
     // 相当于只保存precision精度范围内的值,大于精度范围的值被四舍五入掉
        value = (float) (Math.rint(value * scale) / scale);
        append((int) value);       // 只写入整数部分到char[]中
        if (precision != 0) {
            append(".");
        // 要写小数部分,故去掉正负号
            value = Math.abs(value);
        // floor():返回小于等于x,且与x最接近的整数
        // 相当于只留下小数部分
            value -= Math.floor(value);
            append((int) (value * scale), precision);
        }
        return this;
    }
    @Override
    public String toString() {
        return new String(mChars, 0, mLength);
}
// 该方法判断mChars是否还能存入长度为length的字符。如果不能重新new
// 一个double长度的char[]保存所有字符
    private int reserve(int length) {
        final int oldLength = mLength;
        final int newLength = mLength + length;
        final char[] oldChars = mChars;
        final int oldCapacity = oldChars.length;
        if (newLength > oldCapacity) {
            final int newCapacity = oldCapacity * 2;
            final char[] newChars = new char[newCapacity];
            System.arraycopy(oldChars, 0, newChars, 0, oldLength);
            mChars = newChars;
        }
        return oldLength;
    }
}