本文系本作者原创,如有任何知识产权、版权问题或理论错误,还请指正。 转载请注明原作者及出处,谢谢配合。
Alarm Introduce
Alarm是基于AlarmManager类的闹钟机制,它可以使应用在其生命周期之外执行基于特定时间的操作。比如,定时让service在后台下载天气预报。而该种操作如果发生在应用生命周期内应该尽量避免使用Alarm而是用Handler类配合Timer和Thread类完成,这样可以使Android更好的控制系统资源。
换句话说,Alarm的使用会消耗系统资源:底层alarm计时器,唤醒系统等。所以Android官方在KITKAT之后已经将大部分的alarm设计为非精准闹钟并进行batch操作,即合并一定时间段的alarms统一触发。除非你调用特定的接口申明要精准闹钟,否则设置的闹钟并不一定会在你预想的时间点触发而很有可能有一定的延迟。同时,Android还提供像Google Cloud Messaging (GCM) 这样的机制来替代Alarm执行周期性的访问网络活动。
需要指出的是,Android Doze机制也会限制alarm的触发,当系统进入idle mode(灭屏、不充电、静置一定时间)只有调用特定接口setAndAllowWhileIdle()和setExactAndAllowWhileIdle()的闹钟才会执行,否则可能会被延迟(pending)到Doze的”maintenance window”内执行。
说了这么多并不是说Alarm是个烫手的山芋,已经不再适合使用,而是说我们在使用Alarm的时候需要更加明确、有目的性。想要做到这点,我们首先来了解下Alarm的具体特征:
- 它让你在特定时间点或者周期内执行活动
- 你可以利用它和广播启动一个service执行任务
- 在应用没有运行甚至系统sleep的状态下利用它触发任务执行
- 它可以帮你减少资源使用:不依赖timer,也不需要持续启动后台服务执行任务
下面是使用Alarm的一些best practices:
- 尽量减少alarm的触发频率
- 不要轻易唤醒系统
- 如果不需要精准触发不要使用精准闹钟
- 尽可能的不要让alarm依赖clock time,尽量使用ELAPSED_REALTIME
再说了什么是Alarm,如何正确使用Alarm和Alarm的一些限制后下一章将会介绍应用端如何设置一个Alarm;之后会重点分析AlarmManager的机制,这部分内容我会分两章进行讲解,涉及AlarmManagerService 80%的代码,力求深入、透彻的对AlarmManagerService进行全面剖析。
How to use Alarm
想要理解Android AlarmManager我们首先要从使用其提供的接口设置alarm入手来了解AlarmManager的特性,所以这一章会简单介绍下应用端如何设置一个repeating alarm。需要做的是:选择一个Alarm的类型;设置触发时间和触发周期;提供一个pending intent;
Choose an Alarm Type
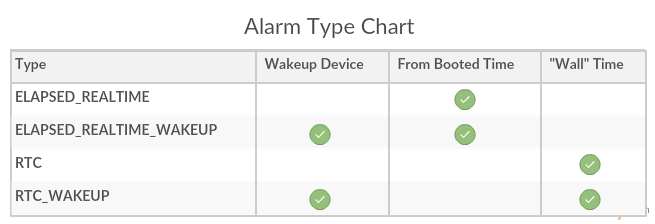
Android Alarm提供4种type的alarm,他们分别是:
- ELAPSED_REALTIME— Fires the pending intent based on the amount of time since the device was booted, but doesn’t wake up the device. The elapsed time includes any time during which the device was asleep.
- ELAPSED_REALTIME_WAKEUP— Wakes up the device and fires the pending intent after the specified length of time has elapsed since device boot.
- RTC— Fires the pending intent at the specified time but does not wake up the device.
- RTC_WAKEUP— Wakes up the device to fire the pending intent at the specified time.
上述4种Type可分为两种常用时钟类型:”elapsed real time”和”real time clock” (RTC):
- Elapsed real time:代表”time since system boot” ,适用于时间推移的alarm,比如每个30秒的alarm,因为它不会受到 time zone/locale的影响
- Real time clock:使用”UTC (wall clock) time”,适用于依赖当前时区(current locale)的alarm
每种时钟类型都有”wakeup”的版本,即在灭屏状态时唤醒设备CPU的alarm。如果没有使用这种类型的alarm,那么设置的alarm会在设备下次醒来时触发。但是”wakeup”的alarm会增大手机功耗所以除非有特殊需求,尽量避免使用该种类型的alarm。
另外,google更推荐使用AlarmManager.ELAPSED_REALTIME* 而不是AlarmManager.RTC*的闹钟,因为RTC使用的是用户可设置的 “wall clock”,因此可能会引发一些不可预测的问题,比如可能会跳回到过去的时间。所以对于Interval or elapsed time的设置可以利用ELAPSED_REALTIME和接口SystemClock.elapsedRealtime()的组合来完成。
alarmManager.set(AlarmManager.ELAPSED_REALTIME_WAKEUP,
      SystemClock.elapsedRealtime()
                 + 60*1000, pendingIntent);
1分钟后触发设置的 pendingIntent。
Scheduling Alarms
这节简单介绍了两种Type的alarm的设置:
- ELAPSED_REALTIME_WAKEUP alarm:
30分钟后触发alarm唤醒系统,以后每30分钟执行一次:
// Hopefully your alarm will have a lower frequency than this!
alarmMgr.setInexactRepeating(AlarmManager.ELAPSED_REALTIME_WAKEUP,
                AlarmManager.INTERVAL_HALF_HOUR,
                    AlarmManager.INTERVAL_HALF_HOUR, alarmIntent);
设置1分钟后触发alarm,唤醒系统:
 private AlarmManager alarmMgr;
 private PendingIntent alarmIntent;
  ...
 alarmMgr = (AlarmManager)context.getSystemService(Context.ALARM_SERVICE);
 Intent intent = new Intent(context, AlarmReceiver.class);
 alarmIntent = PendingIntent.getBroadcast(context, 0, intent, 0);
 alarmMgr.set(AlarmManager.ELAPSED_REALTIME_WAKEUP,
                  SystemClock.elapsedRealtime() +
                      60 * 1000, alarmIntent);
- RTC 实例
在大约12 p.m.触发alarm唤醒系统,以后同样时间每天重复一次:
// Set the alarm to start at approximately 2:00 p.m.
Calendar calendar = Calendar.getInstance();
calendar.setTimeInMillis(System.currentTimeMillis());
calendar.set(Calendar.HOUR_OF_DAY, 14);
// With setInexactRepeating(), you have to use one of the AlarmManager interval
// constants--in this case, AlarmManager.INTERVAL_DAY.
alarmMgr.setInexactRepeating(AlarmManager.RTC_WAKEUP, calendar.getTimeInMillis(),
AlarmManager.INTERVAL_DAY, alarmIntent);
在8:30 a.m.整触发alarm唤醒系统,以后每20分钟触发一次:
private AlarmManager alarmMgr;
private PendingIntent alarmIntent;
...
alarmMgr = (AlarmManager)context.getSystemService(Context.ALARM_SERVICE);
Intent intent = new Intent(context, AlarmReceiver.class);
alarmIntent = PendingIntent.getBroadcast(context, 0, intent, 0);
// Set the alarm to start at 8:30 a.m.
Calendar calendar = Calendar.getInstance();
calendar.setTimeInMillis(System.currentTimeMillis());
calendar.set(Calendar.HOUR_OF_DAY, 8);
calendar.set(Calendar.MINUTE, 30);
// setRepeating() lets you specify a precise custom interval--in this case,
// 20 minutes.
alarmMgr.setRepeating(AlarmManager.RTC_WAKEUP, calendar.getTimeInMillis(),
      1000 * 60 * 20, alarmIntent);
Alarm Manager
这一章主要介绍Alarm Manager中的关键属性和接口为后续深入分析AlarmManagerService做准备。涉及到的属性值有Alarm 的Type、Flag和Window,其中Alarm Type是唯一面向用户的属性(用户可见)前一章已经给出详细的说明,这里只有标记说明。而涉及到的接口如下所示:
public void set(int type, long triggerAtMillis, PendingIntent operation);

public void set(int type, long triggerAtMillis, long windowMillis, long intervalMillis, PendingIntent operation, WorkSource workSource)

public void setRepeating(int type, long triggerAtMillis, long intervalMillis, PendingIntent operation)

public void setInexactRepeating(int type, long triggerAtMillis, long intervalMillis, PendingIntent operation)

public void setWindow(int type, long windowStartMillis, long windowLengthMillis, PendingIntent operation)

public void setExact(int type, long triggerAtMillis, PendingIntent operation)

public void setIdleUntil(int type, long triggerAtMillis, PendingIntent operation)

public void setAlarmClock(AlarmClockInfo info, PendingIntent operation)

public void setAndAllowWhileIdle(int type, long triggerAtMillis, PendingIntent operation)

public void setExactAndAllowWhileIdle(int type, long triggerAtMillis, PendingIntent operation)
以上10个接口最后都是调用AlarmManagerService类的set方法来定义闹钟的,AlarmManagerService根据输入的type,windowLength, flag等来区分每种接口的调用行为:
public void set(int type, long triggerAtTime, long windowLength, long interval, int flags,
              PendingIntent operation, WorkSource workSource,
                  AlarmManager.AlarmClockInfo alarmClock)
Alarm’s TYPE
下图是四种Type的功能表格,从下图可以很清楚地看出每个Type的特点:
Alarm’s FLAG
下图是五种flag的具体分析:
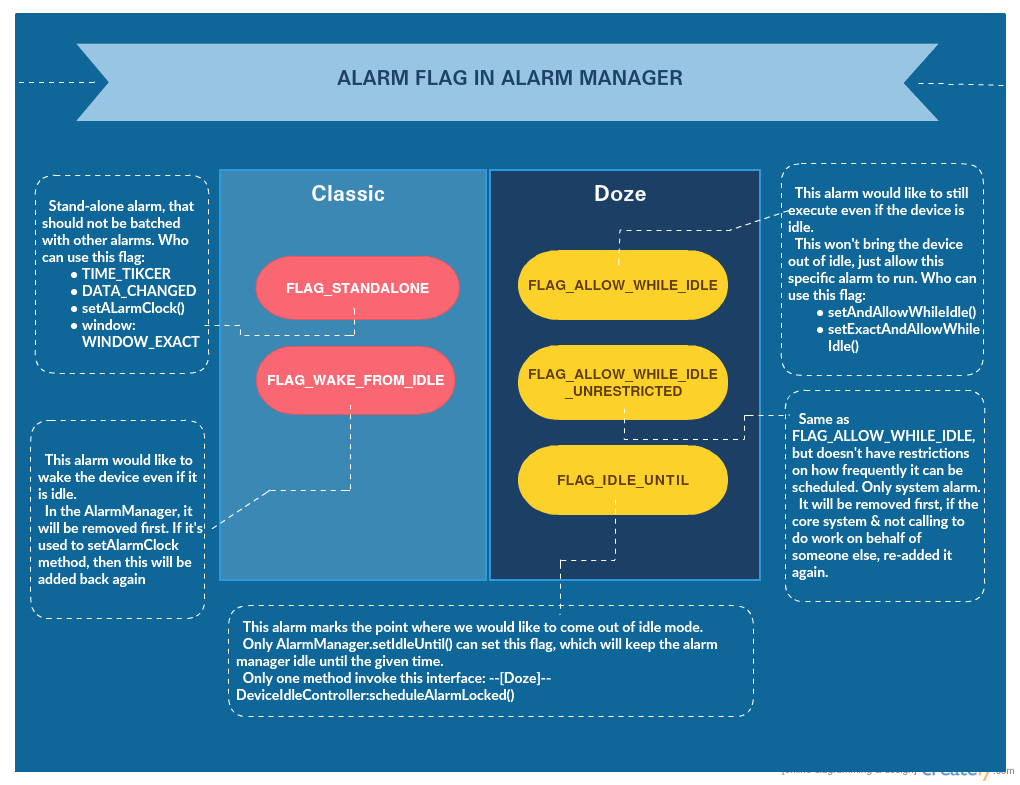
从上图可以看出FLAG_ALLOW_WHILE_IDLE, FLAG_ALLOW_WHILE_IDLE_UNRESTRICTED,FLAG_IDLE_UNTIL三种Flag是针对Doze机制新增的。
其中,FLAG_IDLE_UNTIL Flag只有调用AlarmManager.setIdleUntil()接口才可能设置该flag,因为必须是系统应用system调用才能生效。搜索代码发现,该接口只有Doze的实现类DeviceIdleController: scheduleAlarmLocked()调用,用来使系统进入idle mode直到marker alarm被执行,执行marker alarm时系统会退出idle mode(come out of idle mode)。
FLAG_ALLOW_WHILE_IDLE和FLAG_ALLOW_WHILE_IDLE_UNRESTRICTED 标记的alarm即使在系统idle状态下也会执行,但是不会使系统退出idle mode,只有特殊alarm才需要标记该Flag。如果非系统应用想要在Doze状态下运行该种alarm,可以使用下面接口设置 FLAG_ALLOW_WHILE_IDLE:
/** Like {@link #set(int, long, PendingIntent)}, but this alarm will be allowed to
  * execute even when the system is in low-power idle modes.*/
void setAndAllowWhileIdle(int type, long triggerAtMillis, PendingIntent operation)

/** Like {@link #setExact(int, long, PendingIntent)}, but this alarm will be allowed to
 * execute even when the system is in low-power idle modes.*/
void setExactAndAllowWhileIdle(int type, long triggerAtMillis, PendingIntent operation)
而FLAG_ALLOW_WHILE_IDLE_UNRESTRICTED因为对alarm的频率没有限制,所以只有核心系统控件并且是not calling to do work on behalf of someone else的alarm才能设置该Flag,意思是即使是在idle mode也可以正常触发,并且没有时间限制。
FLAG_STANDALONE代表精准alarm,该属性的alarm不能被batch,涉及到该Flag的地方有:
1. mService:set()中如果windowLength设置为精准(WINDOW_EXACT),alarmManager会添加FLAG_STANDALONE flag
2. mService:set()中如果是setAlarmClock方法的实现,会有AlarmClockInfo参数,说明是闹钟必须是精准的,而且是可以唤醒系统的
3. ACTION_TIME_TICKER 的scheduleTimeTickEvent()
4. ACTION_DATE_CHANGED的 scheduleDateChangedEvent()
FLAG_WAKE_FROM_IDLE 这种alarm即使在idle mode也会唤醒系统,比如alarm clock。set方法不允许使用FLAG_WAKE_FROM_IDLE flag,alarm manager会在后续处理: 如果是setAlarmClock方法,会有AlarmClockInfo参数,说明是闹钟必须是精准的,而且是可以唤醒系统的,即alarmclock,后续会被重新添加FLAG_WAKE_FROM_IDLE flag。
Alarm’s WINDOW
- WINDOW_EXACT: 需要精准闹钟时设置该window,系统不会batch该window的alarm。使用该window的接口有:
void setExact(int type, long triggerAtMillis, PendingIntent operation);

void setIdleUntil(int type, long triggerAtMillis, PendingIntent operation);

void setAlarmClock(AlarmClockInfo info, PendingIntent operation);

void setExactAndAllowWhileIdle(int type, long triggerAtMillis, PendingIntent operation);
- WINDOW_HEURISTIC: 非精准alarm时使用该window,明确声明使用该window的接口有:
void setInexactRepeating(int type, long triggerAtMillis, long intervalMillis, PendingIntent operation);

void setAndAllowWhileIdle(int type, long triggerAtMillis, PendingIntent operation); ---- is never used
以下两个接口在KITKAT之后使用的是WINDOW_HEURISTIC非精准alarm,即Android version小于KITKAT时legacyExactLength()返回值是WINDOW_EXACT,否则返回值是WINDOW_HEURISTIC类型。
void set(int type, long triggerAtMillis, PendingIntent operation);

void setRepeating(int type, long triggerAtMillis, long intervalMillis, PendingIntent operation);
Alarm’s INTERFACE
以下接口是针对标准情况的接口(其Flag值都是0),在AlarmManagerService中会对某些接口设置的alarm的flag进行调整,比如setAlarmClock后续会被添加FLAG_WAKE_FROM_IDLE和FLAG_STANDALONE两个flag;而window为WINDOW_EXACT的alarm后续会被加上FLAG_STANDALONE flag:
public void set(int type, long triggerAtMillis, PendingIntent operation);
  Window: legacyExactLength()

public void setRepeating(int type, long triggerAtMillis, long intervalMillis, PendingIntent operation)
  Window: legacyExactLength()

public void setInexactRepeating(int type, long triggerAtMillis, long intervalMillis, PendingIntent operation)
  Window: WINDOW_HEURISTIC

public void setExact(int type, long triggerAtMillis, PendingIntent operation)
  Window: WINDOW_EXACT

public void setAlarmClock(AlarmClockInfo info, PendingIntent operation)
  Window: WINDOW_EXACT

public void setWindow(int type, long windowStartMillis, long windowLengthMillis, PendingIntent operation)
  Window:  windowLengthMillis, (customized by yourself)
以下三个接口是针对Doze机制的,每个都定义了自己的Flag和Window:
public void setIdleUntil(int type, long triggerAtMillis, PendingIntent operation)
  Window: WINDOW_EXACT
  Flag: FLAG_IDLE_UNTIL

public void setExactAndAllowWhileIdle(int type, long triggerAtMillis, PendingIntent operation)
  Window: WINDOW_EXACT
  Flag: FLAG_ALLOW_WHILE_IDLE

public void setAndAllowWhileIdle(int type, long triggerAtMillis, PendingIntent operation)
  Window: WINDOW_HEURISTIC
  Flag: FLAG_ALLOW_WHILE_IDLE
如果是系统控件并且workSource为空,AlarmManagerService中会给该alarm加入FLAG_ALLOW_WHITE_IDLE_UNRESTRICTED flag.
AlarmManagerService Workflow
Set an Alarm (Top 2 Bottom)
下面我以setExact接口为例,讲解从用户调用AlarmManager的接口到最后将alarm设置到kernel的流程,其流程图如下:
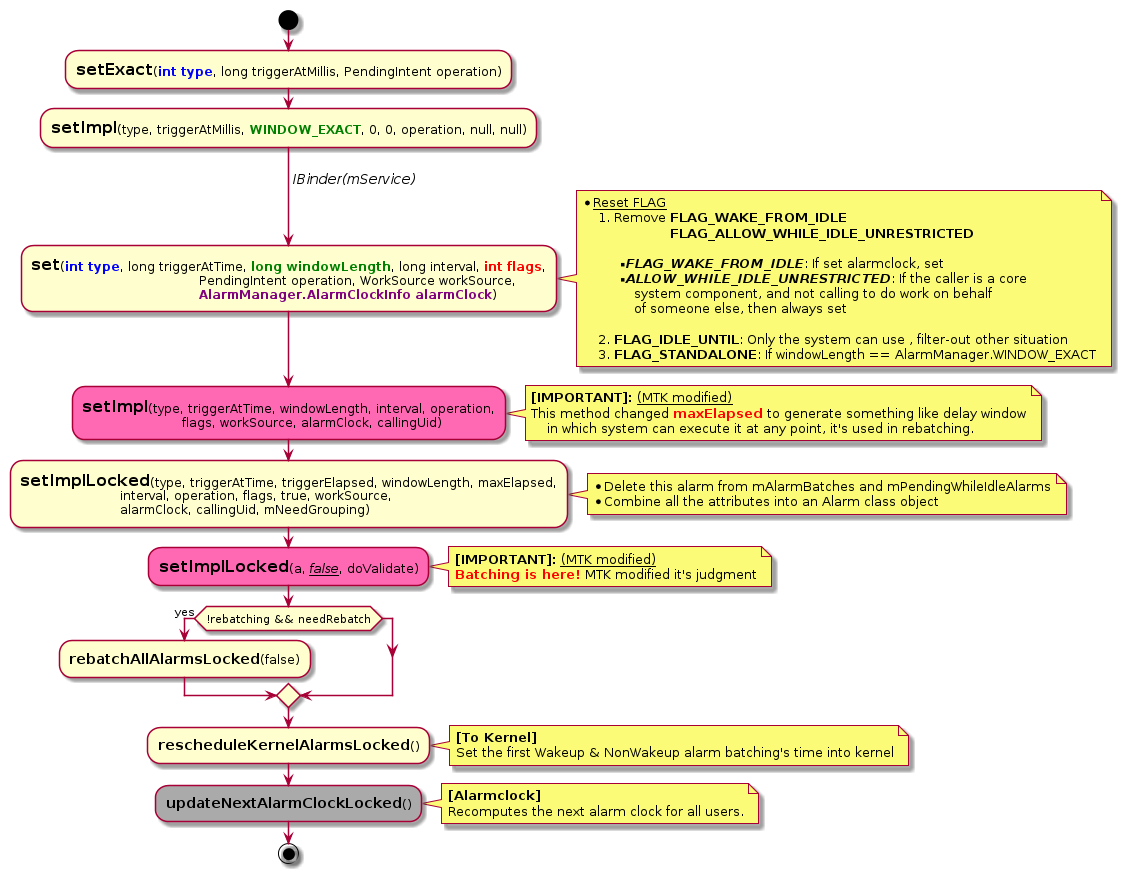
当用户使用setExact接口设置某一type的alarm时,AlarmManagerService得到用户设置的alarm的属性有:type为用户定义的type;window是WINDOW_EXACT;flag为FLAG_STANDALONE(AMS在set方法中重新给alarm添加的flag)。
然后AMS调用setImpl方法,在该方法中会给这个alarm计算出一个maxElapsed值,该值就是alarm可以被delay的最大值。可能的设置为本身间隔的75%(时间差在10s以上),或者是SetWindow/set系统调用的方法设置的窗口时间大小,表示用户已经定义了浮动空间,直接取该范围.
接下来使用同步锁调用方法setImplLocked,将该alarm从mAlarmBatches 和 mPendingWhileIdleAlarms中删除,并将所有alarm的属性包装进Alarm类对象中。其中mAlarmBatches 和 mPendingWhileIdleAlarms是两个很重要的列表,它们的作用如下:
- mAlarmBatches: 保存所有alarm Batch的列表——针对Batch
- mPendingWhileIdleAlarms: 保存idle状态(手机灭屏睡下去)时pending的alarm的列表 ——针对alarm
接下来会调用一个很重要的方法setImplLocked(a, flase, doValidate),该方法首先处理了某些flag,比如FLAG_IDLE_UNTIL。然后会对alarm进行batch操作,即如果有合适的Batch会将该alarm添加到该Batch中,否则新建一个Batch存放该alarm。当然并不是所有的alarm都会被Batch,flag为FLAG_STANDALONE的alarm就不会被batch。最后对flag为FLAG_IDLE_UNTIL或者FLAG_WAKE_FROM_IDLE的alarm进行判断,因为这两个flag的alarm会唤醒系统,所以一旦条件发生变化还需要重新rebatch所有alarms。
最后就是调用rescheduleKernelAlarmsLocked将该alarm设置到kernel去,并使用updateNextAlarmClockLocked接口重新计算下一个alarm clock(通过setAlarmClock 设置的alarm)
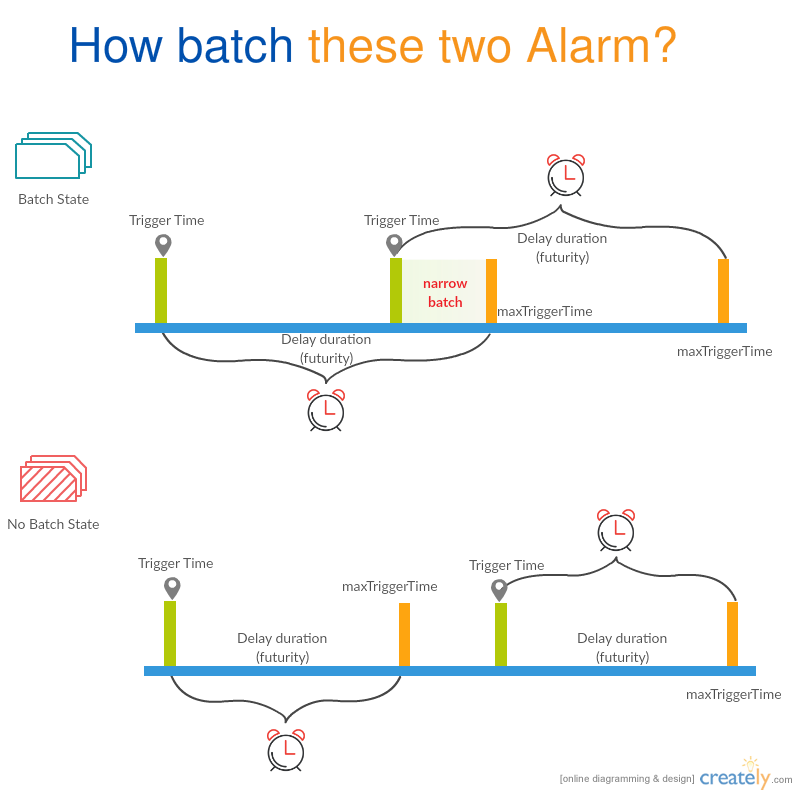
下图描述了batch的机制。如果两个alarm触发时间区域(Trigger Time 指用户指定的触发时间,maxTriggerTime 指AMS计算出的最大延迟触发时间)有交集,那么这两个alarm会被batching到一个Batch中,而这个Batch的开始和结束时间点会被缩小为两alarm相交部分,即下图中的"narrow batch"的两个端点,这样下一个alarm的触发时间区域必须与Batch的"narrow batch"区域有交集才会被batching到同一个Batch中,并且会继续缩小Batch的"narrow batch"区域。这种处理可以控制每个alarm被延迟的时间。
如果alarm没有与任何一个Batch或者alarm有交集,那么AMS会新建一个Batch专门存放该alarm,如下图"No Batch State"部分。
另外, 流程图中方法rescheduleKernelAlarmLocked如果发生“mNativeData from RTC is abnormal”的异常情况,不执行set动作而是直接找到trigger的alarm send出去,这部分内容使用到AlarmHanlder: (MSG:ALARM_EVENT)进行处理:
triggerAlarmsLocked(triggerList, nowELAPSED, nowRTC)得到需要trigger alarm的列表updateNextAlarmClockLocked:更新mNextAlarmClockForUser; 发送NEXT_ALARM_CLOCK_CHANGED广播\- 将需要trigger alarms全部send出去
流程图中最后一步使用到updateNextAlarmClockLocked方法,其note中标注的AlarmClock是为了通知所有相关用户 NEXT_ALARM_CLOCK_CHANGED,并发送广播。其实现是通过AlarmHandler的(MSG:SEND_NEXT_ALARM_CLOCK_CHANGED)中处理发送广播等动作。
Execute an Alarm (Bottom 2 Top)
闹钟设置后当alarm设置的时间到了AMS的操作流程如下:
当系统开机SystemServer启动AMS后,AMS就给自己注册了个线程池AlarmThread ,它会循环侦听处理底层RTC上报的闹钟触发事件,这是触发的入口点。这里通过native的waitForAlarm方法来接收这种事件。waitForAlarm返回值可区分为两种类型,一种是系统时间改变的事件,另一种就是非系统时间改变的事件,这种就包含了alarm时间到的触发事件。
如果是系统时间改变的事件,AMS会清除当前TIME_TICK的alarm并重新发送;rebatch所有alarms;发送ACTION_TIME_CHANGED的广播通知用户时间改变了。
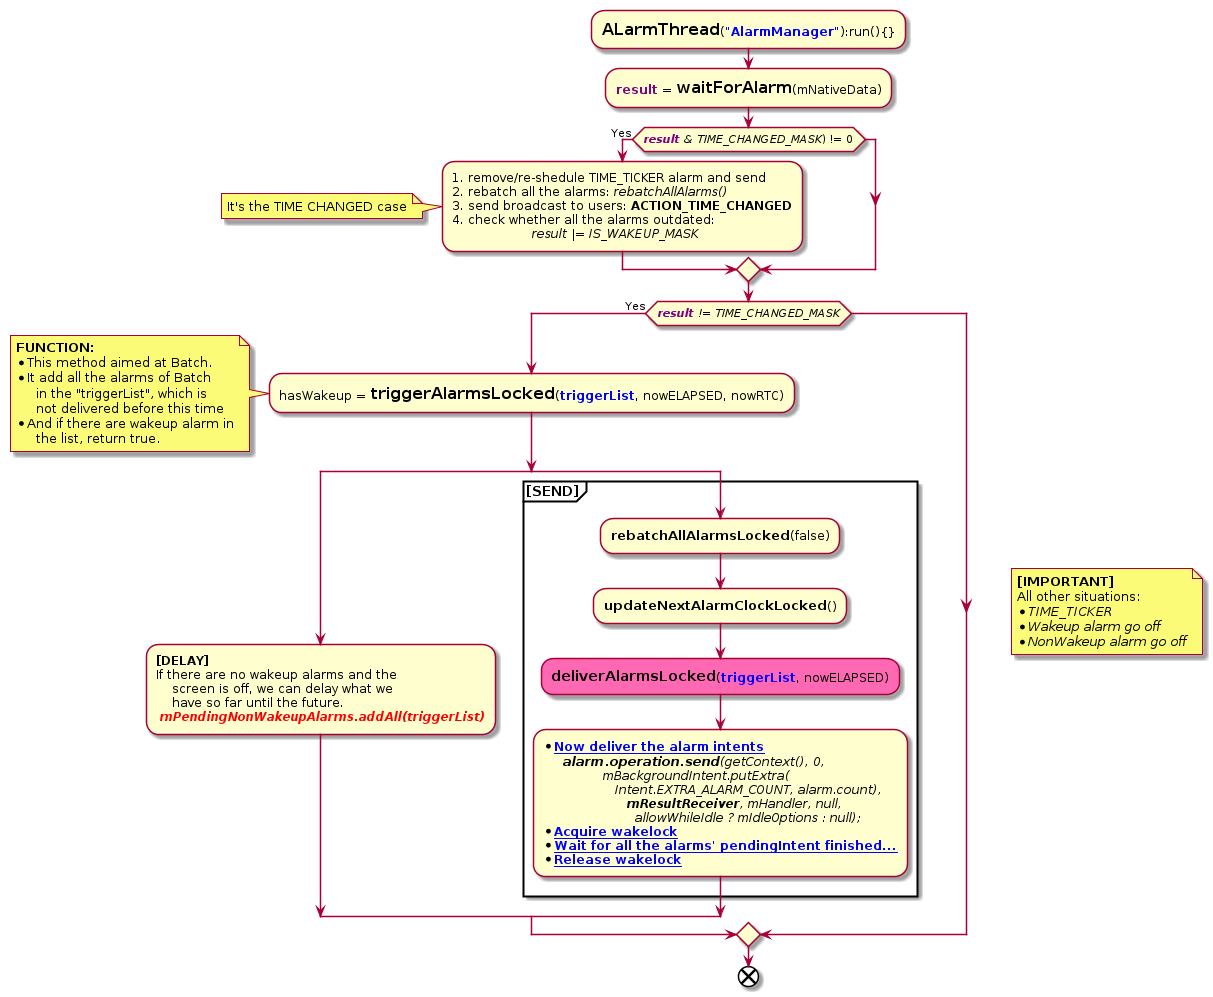
如果是另一种情况,表明有alarm的触发时间到了,所以需要触发对应的alarm。做法是首先新建一个triggerList的列表用来保存所有准备触发的alarms,然后通过triggerAlarmsLocked方法在mAlarmBatches列表中找到所有准备触发的alarms并添加到triggerList中,这里是针对Batch进行操作的,如果该Batch符合要求,它的所有alarms都会被添加进去。注意,triggerAlarmsLocked方法还会对repeat的alarm进行处理,即重新计算该alarm下一次触发时间并通过setImplLocked设置一个包含所有该alarm属性的新的repeat alarm。
如果triggerList中的alarm没有唤醒系统的alarm,并且当前是灭屏状态,那么AMS认为这是一次可以pending的触发,会将triggerList中的所有alarm添加到mPendingNonWakeupAlarms,并不会触发这些alarm。
如果不是以上情况,那么AMS会将triggerList中的所有alarm和之前添加到mPendingNonWakeupAlarms中的alarm全部deliver出去:
alarm.operation.send(getContext(), 0, mBackgroundIntent.putExtra(
       Intent.EXTRA_ALARM_COUNT, alarm.count),
           mResultReceiver, mHandler, null, allowWhileIdle ? mIdleOptions : null);
上述函数中的 mResultReceiver 继承自PendingIntent.OnFinished。当AMS开始发送alarm的pendingIntent时会申请一个wakelock,通过mResultReceiver可知每个alarm的pendingIntent的执行情况。如果全部alarms的pendingIntent被执行完了,mResultReceiver会释放该wakelock。
下图模拟了整个alarm触发时间的事件:

TIME TICK
TIME_TICK,即每分钟触发的alarm。Status bar上显示的时间就是通过接收该alarm发送的action ACTION_TIME_TICK 的Broadcast来更新的。
开机后AlarmManagerService会在onStart方法中主动set一个1分钟的type为ELAPSED_REALTIME,flag为FLAG_STANDALONE的alarm,其PendingIntent是mTimeTickSender。设置代码如下:
setImpl(ELAPSED_REALTIME, SystemClock.elapsedRealtime() + tickEventDelay, 0,
       0, mTimeTickSender, AlarmManager.FLAG_STANDALONE, workSource, null,
               Process.myUid());
后续TIME_TICK的alarm都是这个alarm触发的,因为AMS会在其定义的BroadcastReceiver:ClockReceiver中接收该alarm触发的pendingIntent并再次设置该alarm。
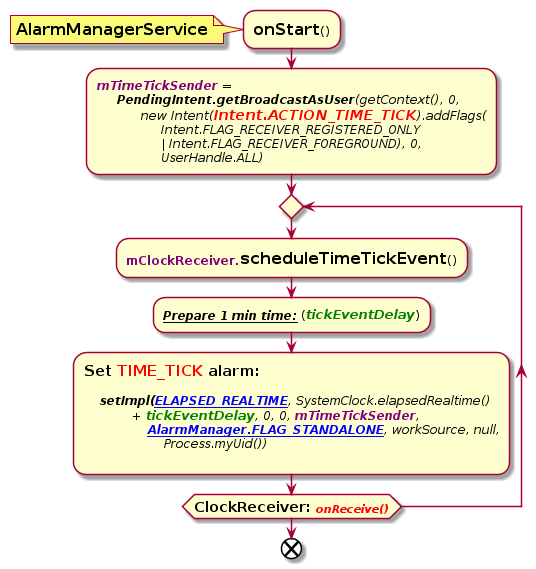
也就是说TIME_TICK的alarm是开机后从AlarmManagerService中发起,然后在AlarmManagerService中接收第一次发起收到的TIME_TICK的广播继续循环设置1min的alarm,流程图如上所示。
这里需要注意的是scheduleTimeTickEvent在计算下一次触发时间时的代码:
final long nextTime = 60000 * ((currentTime / 60000) + 1);

// Schedule this event for the amount of time that it would take to get to
// the top of the next minute.
final long tickEventDelay = nextTime - currentTime;
这里(currentTime / 60000)得到的是一个整数值,再+1就是下1min的表示,这样(nextTime – currentTime)得到的就是到下1min需要的实际时间,该值小于等于1min。